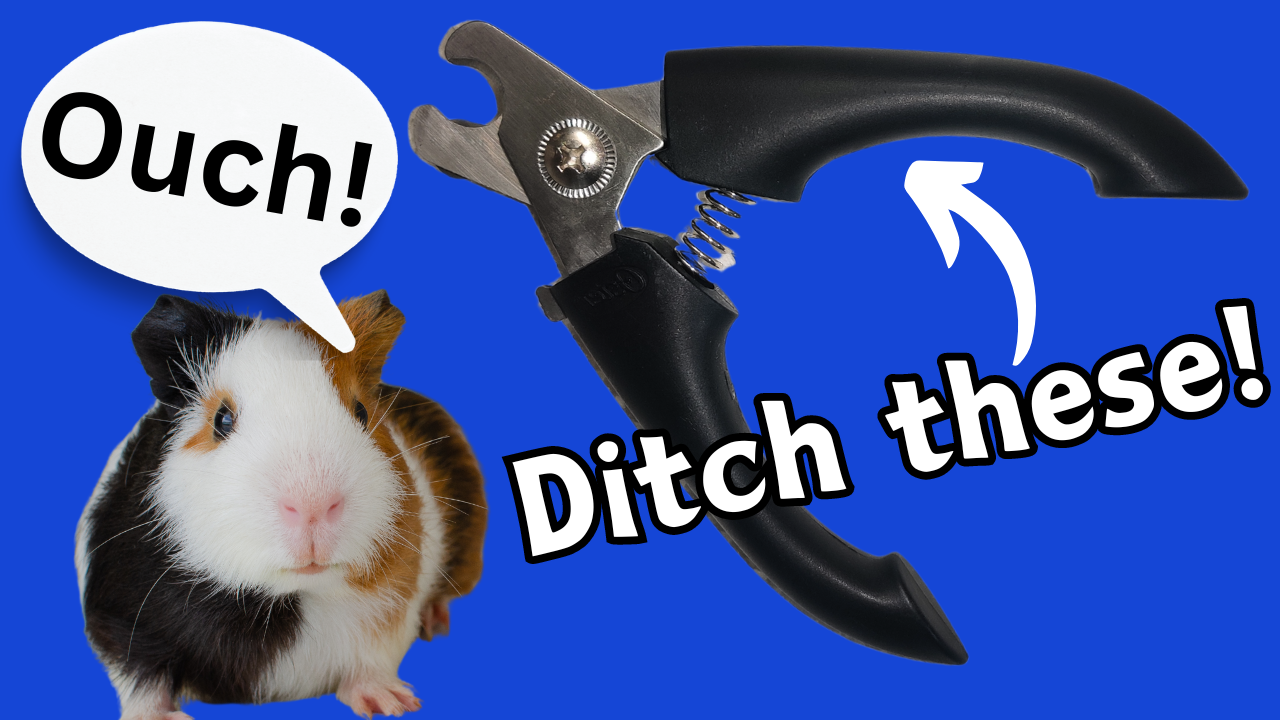
Are you a guinea pig parent who dreads the daunting task of nail trims? Do you find yourself anxious about accidentally clipping too far or causing your furry friend discomfort? You’re not alone. Nail trims can be nerve-wracking for both new and experienced guinea pig owners alike. But fear not, there’s an alternative method that may just revolutionize your nail trimming routine: the Dremel. This guinea pig nail grinder is essentially just a rotary tool with a nail file on the end.
In a recent video we shared invaluable insights into using a Dremel for guinea pig nail trims. If you’re curious about this innovative approach or simply seeking tips to improve your nail trimming technique, keep reading or watch the full video for a comprehensive guide.
Why Dremel?
So, what exactly is a Dremel, and why is it gaining traction among guinea pig owners? In simple terms, a Dremel is a rotary tool equipped with a nail file attachment. Unlike traditional clippers, the Dremel allows for precise control and reduces the risk of clipping the quick, the sensitive blood vessel within the nail.
The Benefits of Dremel
One of the biggest challenges with traditional nail clippers is the fear of hitting the quick, causing pain and bleeding. With a Dremel, this risk is significantly reduced. The gentle grinding action of the Dremel means even a slight touch to the nail can make a difference, minimizing the chances of injury.
Overcoming Challenges
A common concern is the sound of the Dremel, which can be intimidating for guinea pigs. However, with patience and positive reinforcement, many guinea pigs can acclimate to the sound over time. Start with the Dremel fairly far away from them while feeding treats, and slowly move it closer.
Getting Started
To begin, ensure you have the necessary supplies: a Dremel, treats (like veggies), and clotting powder or gel. Treats are essential for keeping your guinea pig calm and distracted during the process. Maple’s preferred treat? A good old carrot.
Step-by-Step Guide
It’s important to take it slow and steady. By allowing your guinea pig to nibble on a treat while you work, you create a positive association with the experience while also distracting them and keeping them still.
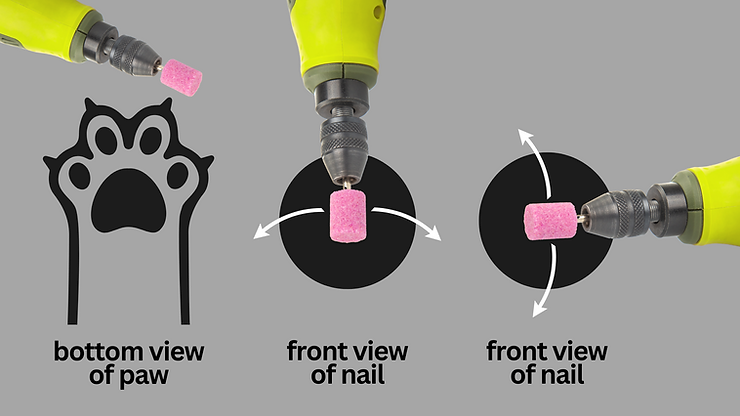
The main goal of the trim is to shorten the nail, so gently press the Dremel bit to the end of the nail and slowly move it back and forth to prevent any heat from friction. As you gain experience and confidence, you can also round off the nail tip by Dremeling a bit of the top, bottom, and sides of the nail. Rounding off the nail like this will both make it less sharp but also recede the quick more and effectively shorten more of the nail, allowing for more time in between nail trims.
Practice Makes Pawfect
For those new to Dremel nail trims, I recommend starting with the back paws before moving on to the trickier front paws. Patience is key, so don’t be discouraged if it takes time for both you and your guinea pig to adjust.
Final Thoughts
While nail trims may never be your guinea pig’s favorite activity, mastering the Dremel technique can make the process safer and less stressful for both of you. Remember to be patient, use positive reinforcement, and always prioritize your furry friend’s comfort and well-being.
Watch the Video
For a visual demonstration and additional tips, be sure to watch the full video on our YouTube channel. Don’t forget to subscribe for more informative content tailored to guinea pig enthusiasts like you. Or if you’d prefer to learn more about handling guinea pigs, learn the 6 Reasons Your Guinea Pigs is Biting You and How to Stop It.
Frequently Asked Questions About Guinea Pig Nail Trimming
What are the best guinea pig nail clippers to use?
Traditional guinea pig nail clippers are small, curved clippers designed for precision. However, many pet parents now prefer using a guinea pig nail trimmer like a Dremel, which files rather than cuts the nail—reducing the risk of hitting the quick and causing bleeding.
How do I trim my guinea pig’s nails at home?
Guinea pig nail trimming at home involves gently holding your piggy, using a nail clipper or trimmer, and trimming only a small portion of the nail. A nail grinder like a Dremel can be a safer, more gradual alternative. Have treats and clotting powder on hand in case of accidents.
How do I know if my guinea pig’s nails are too long?
Overgrown guinea pig nails often curl or bend sideways and can affect how your piggy walks. If your guinea pig’s nails are curled or clicking on the floor, it’s time for a trim. Keeping nails trimmed also helps the quick recede over time.
What happens if I cut my guinea pig’s nail too short?
If you accidentally cut your guinea pig’s nail too short, you may hit the nail quick, causing pain and bleeding. Use a styptic powder or gel to stop the bleeding and soothe the area. Don’t worry—your guinea pig will recover quickly with proper care.
How do I stop guinea pig nail bleeding?
To stop guinea pig nail bleeding, apply a clotting agent like Kwik Stop styptic powder or a styptic gel. Hold pressure for a few seconds, and keep your piggy calm. Avoid handling the paw too much until the bleeding stops completely.
Can I use a nail grinder on guinea pigs?
Yes! A rotary tool like a Dremel is a great option, especially if you’re nervous about cutting the quick. It lets you file gradually and smooth out rough edges. Be sure to go slow and reward your guinea pig with treats.
Is there a guinea pig nail trimming service near me?
If you’re not comfortable trimming nails yourself, many exotic vets or small animal groomers offer guinea pig nail trimming near you. Search for “guinea pig nail trimming near me” or contact local rescues or pet shops that specialize in small animals. If you’re in the Tampa Florida area, you may be close enough to me that I could even help, feel free to reach out to me!
How often should I trim my guinea pig’s nails?
Most guinea pigs need a nail trim every 3–4 weeks. However, nail growth can vary, so check regularly. Using a Dremel can help you maintain ideal guinea pig nail length and reduce how often you need full trims. Read our Ultimate Guinea Pig Care Routine for answers to all your questions about what care tasks needs to be done when.
Can I use a nail file for guinea pig nails?
Yes, a rough nail file or emery board can help smooth edges after trimming. While not as effective for reducing length, it’s great for finishing touches or helping new owners get their guinea pig used to nail care.
What if my guinea pig is too scared to let me hold them?
If your guinea pig is always running and gets scared when you hold them, you may want to check out the taming exercises within this article about why guinea pigs bite.